Rooting a Oneplus 3T Phone
I recently rooted my Oneplus 3T phone on Android 7.1.1. Finding the right information was not as easy as I thought it might be, so here's my summary. I used my macbook, you will need your USB cord to connect the phone. Warning - you will end up wiping your phone during this process, I'd recommend performing a backup prior. I didn't as I figured most app data are synced to the cloud, the only things I noticed missing was SMSs and things like numbers and Whatsapp history where a sync to the cloud occurred on a weekly basis.
1. Unlock the Bootloader #
a. If you haven't already done so, you will need to enable Developer Options on your phone by tapping 7x on the Build Number found in your phone under Settings > About Phone > Build Number. Once enabled, navigate to Settings > Developer Options > USB debugging and ensure this is toggled to ON.
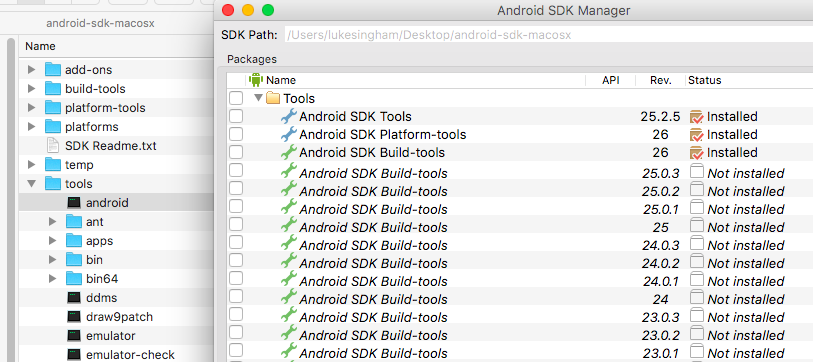
b. You will now need to obtain the Android Software Development Kit to run commands on your phone from your computer terminal. This provides several tools you will use including Android Development Bridge (ADB) and Fastboot. Once downloaded, unzip and place the files in a place where you can find them. Then navigate to the folder and launch the Android SDK manager by double clicking on android-sdk-macosx/tools/android. This will provide a GUI to install the tools needed as per the following screenshot.
Now you are ready to run some commands:
# Navigate to the tools
$ cd /android-sdk-macosx/platform-tools
# Check that your phone is connected properly
$ adb devices
List of devices attached
fc031cd8 device

# Reboot phone into bootloader
$ ./adb reboot bootloader
# Unlock the phone
$ ./fastboot oem unlock
The last command will wipe your phone. Once complete you will then boot up the phone and need to repeat the process in step 1.a.
2. Install TWRP Custom Recovery #
I chose the open source TWRP recovery software. You can get a copy of TWRP here. Without the installation of TWRP, Step 3 will not be possible (I tried but the OnePlus recovery won't allow you to install SuperSu).
# Check that your phone is connected properly
$ adb devices
List of devices attached
fc031cd8 device

$ ./fastboot flash recovery /YOUR/PATH/TO/TWRP.img
$ ./fastboot reboot
3. Root Via Flashing SuperSU #
If you haven't already download Android File Transfer. Transfer the SuperSU zip into the root of your phone. Ensure Settings > Developer Options > Advanced Reboot is toggled to on. Then press the power off button and select Reboot > Recovery. From here you will have the new TWRP menu to select Install and choose the SuperSu zip file. You will need to swipe right to confirm the Flash.
One Small Hiccup #
I encountered one issue in this process. SuperSu was not installing from the TWRP menu. I stopped the above process in between Step 2 and Step 3 as I had to go to bed for work the next day. On booting my phone for the day, I let my android install apps associated with my google account. Normally a great feature when signing into a new phone or one that has been formatted. However, the phone must be freshly wiped to be able to install SuperSu. So I had to separately wipe the phone again using the following commands found on this SO answer:
$ ./adb reboot bootloader
# Wait a few seconds...

# Check the phone is in bootloader
$ ./fastboot devices
# Wipe user data
$ ./fastboot -w
Useful Resources #
✍️ Want to suggest an edit? Raise a PR or an issue on Github