How to Use Shiny Containers with Shinyproxy
Aim: Setup shinyproxy as a production level way of deploying multiple containerised shiny apps with authentication. Additionally I'll demonstrate how to incorporate containerised python web apps and deploy this behind a reverse proxy using Nginx.
Conceptual Overview
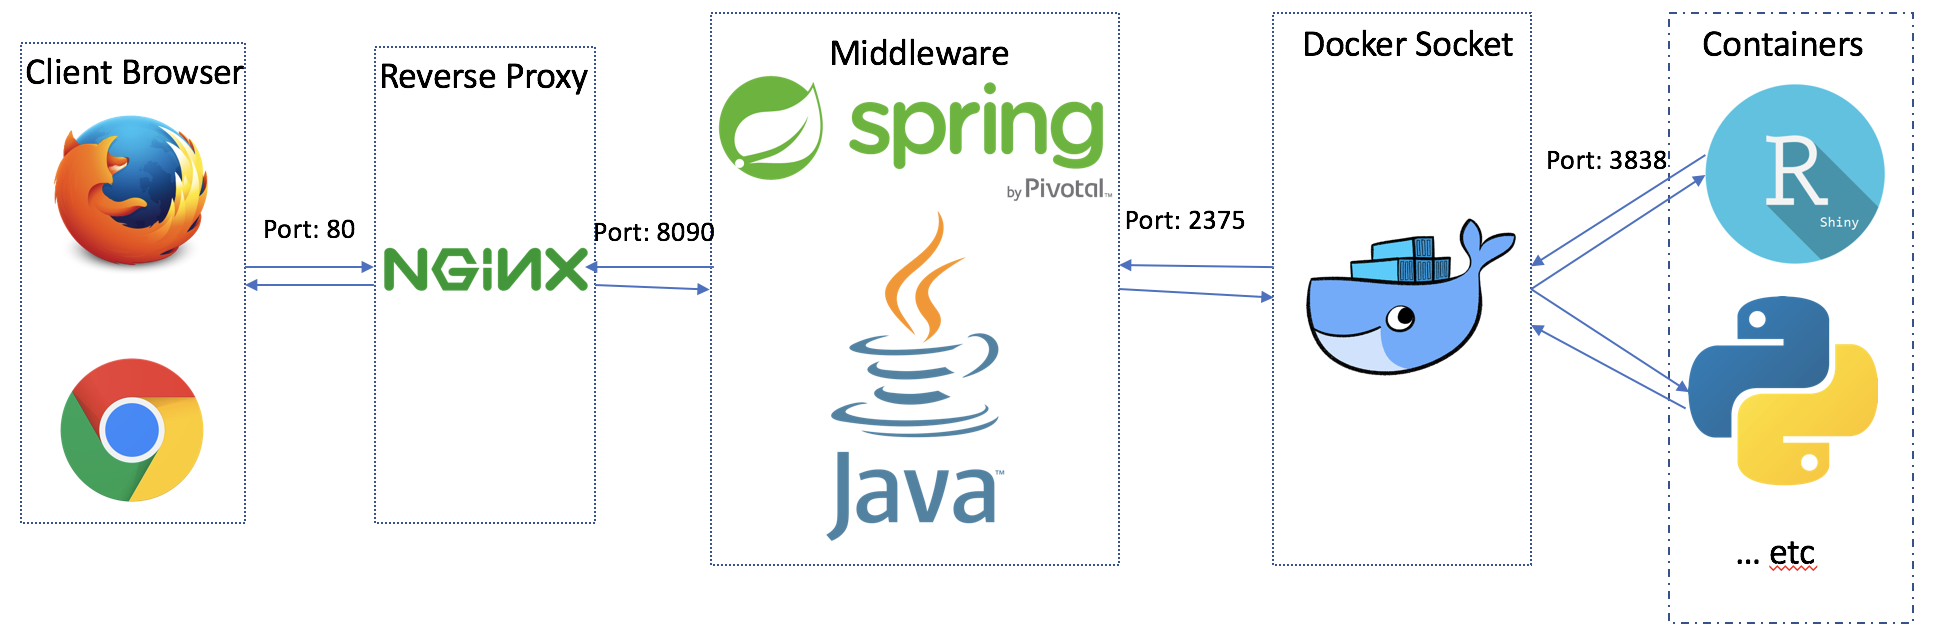
This is a pretty significant piece of software. It renders Shiny Server Pro redundant. As this solution provides authentication, scalability, decreases maintenance (containers) and enables any web app to be running behind the scenes. So you could have a shiny app, a Django app, a flask app, Vue.js... and the end-user will simply see a website, whilst the backend has a whole range of different web applications spinning up on demand.
I ran into some hurdles with these instructions. So I'm documenting what worked for me. My setup: I set this up once on a Dell XPS 13 with a fresh install of Ubuntu 16.04.3 LTS and a Ubuntu 16.04.03 Azure VM.
Pre-requisites / Assumptions #
Docker #
If you don't have Docker installed yet, I highly recommend running through Part 1: Orientation and setup to Part 3: Services of Docker's Getting Started Documentation.
If running the following commands return similar console prints you should be fine to continue on.
$ docker -v
# Docker version 17.06.2-ce, build cec0b72

$ docker run hello-world
# Hello from Docker!
# This message shows that your installation appears to be working correctly.
Docker Problems Encountered for Ubuntu 16 #
The most time consuming part of the setup were the instructions for Ubuntu 16 on the shinyproxy site guiding modification of /lib/systemd/system/docker.service. Per the documentation on Shinyproxy:

Running this configuration produced the following error:
$ sudo systemctl restart docker
# Job for docker.service failed because the control process exited with error code. See "systemctl status docker.service" and "journalctl -xe" for details.
Solution #
Instead, edit /lib/systemd/system/docker.service and set ExecStart to:
ExecStart=/usr/bin/dockerd -H fd:// -D -H tcp://127.0.0.1:2375Why? Shinyproxy will look to talk to the docker daemon on tcp://127.0.0.1:2375. If it can't, then the application won't work.
Ensure that you restart docker after editing the config with the following commands:
$ sudo systemctl daemon-reload
$ sudo systemctl restart docker
Java8 #
Shinyproxy requires a minimum of Java 8. I followed the advice per shinyproxy.io and installed the OpenJDK Zulu. This Quora answer from the product manager of Zulu gives some context behind this JDK.
Run the following at the command line:
$ java -version
# openjdk version "1.8.0_144"
# OpenJDK Runtime Environment (Zulu 8.23.0.3-linux64) (build 1.8.0_144-b01)
# OpenJDK 64-Bit Server VM (Zulu 8.23.0.3-linux64) (build 25.144-b01, mixed mode)
If you have Java 8 then continue. N.B. Zulu 8.xx.x.x is Java 8. Otherwise, run the following commands to install:
$ sudo apt-key adv --keyserver hkp://keyserver.ubuntu.com:80 --recv-keys 0x219BD9C9
$ apt_source='deb http://repos.azulsystems.com/debian stable main'
$ apt_list='/etc/apt/sources.list.d/zulu.list'
$ echo "$apt_source" | sudo tee "$apt_list" > /dev/null
$ sudo apt-get update
$ sudo apt-get install zulu-8
N.B. I did experience a maven build fail when running mvn -U clean install on a Mac with a Java9 runtime. Uninstalling Java 9 and running brew cask install java8 fixed the problem.
Download and Compile Shiny Proxy #
There are two options for downloading the shinyproxy software.
Option 1 - I cloned the shinyproxy repo. I did not have apache maven installed so I needed to run through the installation of maven first.
# Clone the repo
$ git clone https://github.com/openanalytics/shinyproxy.git

# Change directory
$ cd shinyproxy/

# Compile the program
$ mvn -U clean install
Option 2 - You can also go to the downloads page and select the latest file for your particular operating system.
Pull the shiny app containers #
We now have shinyproxy ready to run containerised applications. However, we don't have the images that shinyproxy is expecting. We need to pull those first:
# Pull the shiny app images
$ sudo docker pull openanalytics/shinyproxy-demo

# Check they are now in the list of docker images
$ docker images | grep shinyproxy
Run Shiny Proxy #
Run the following commands:
# Ensure you are in the right directory
$ cd ~/shinyproxy/target/

# Run shinyproxy
$ java -jar shinyproxy-1.0.0.jar
At this point you should now be able to navigate to http://localhost:8080 and see the sign in page and login with 'tesla' and 'password' as username and password respectively. If you are doing this on a remote server, test the application is up and running by running:
# Print the html of the site to the terminal
curl http://localhost:8080
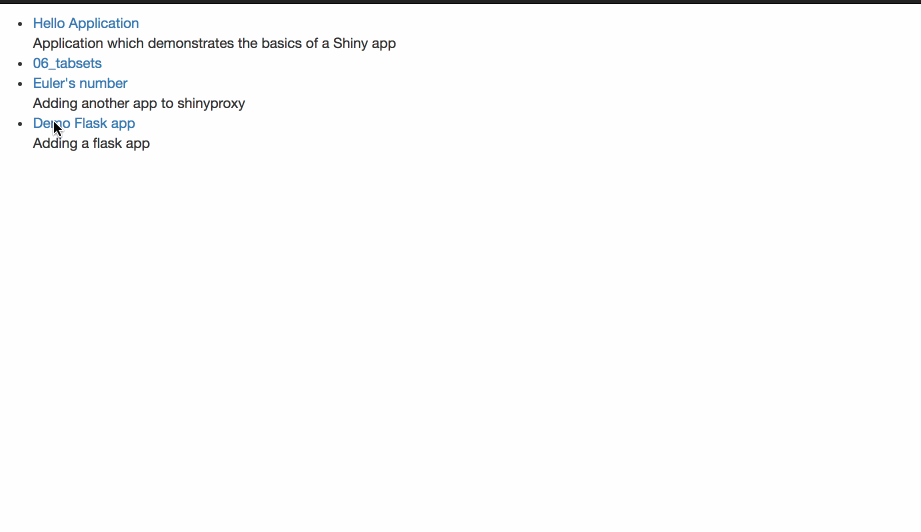
Once logged in launch an application.
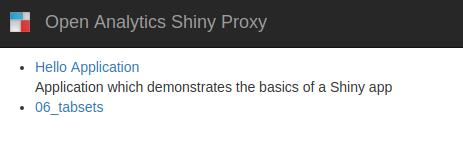
And bingo we have a containerised and authenticated shiny environment.

Adding Additional Shiny Apps #
Shinyproxy docs provide a ready to go shiny application with a dockerfile to build the image. Of course, to use shinyproxy for your own custom shiny applications the dockerfile in the shinyproxy-template repo acts as a template to follow. I'm going to go through the process of adding shinyproxy's pre-built shiny app.
# Clone the shiny app repo
$ git clone https://github.com/openanalytics/shinyproxy-template.git
# Change into the repo
$ cd shinyproxy-template/
# Build the image
$ docker build -t openanalytics/shinyproxy-template .
# Check the image is now available in docker
$ docker images | grep "shinyproxy-template\|REPOSITORY"
# REPOSITORY TAG IMAGE ID CREATED SIZE
# openanalytics/shinyproxy-template latest 16e8c49e2261 25 minutes ago 851MB
# Check the shiny app runs normally outside shinyproxy
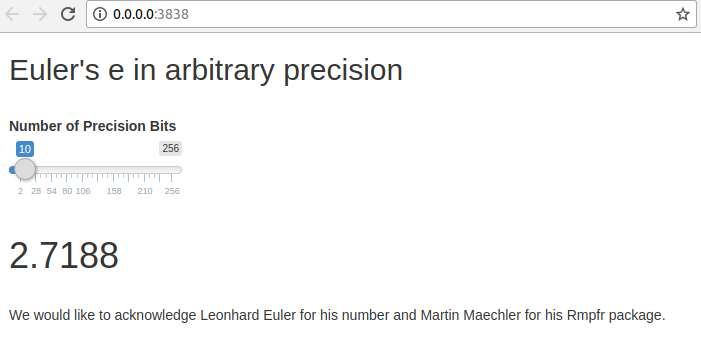
$ docker run -it -p 3838:3838 openanalytics/shinyproxy-templateThe new shiny app should now be running on http://0.0.0.0:3838/.
Now we need to tell shinyproxy to include this additional shiny app by creating and editing an application.yml file.
# Ensure you are in the right directory
$ cd ~/shinyproxy/target/

# Create application.yml from repo template
$ curl https://raw.githubusercontent.com/openanalytics/shinyproxy/master/src/main/resources/application-demo.yml > application.yml
We now need to add our new shiny app to the application.yml file.
apps:
  - name: euler
    display-name: Euler's number
    description: Adding another app to shinyproxy
    docker-cmd: ["R", "-e shiny::runApp('/root/euler')"]
    docker-image: openanalytics/shinyproxy-template
    groups: scientists
Now I'm going to run shinyproxy again to confirm the change has been successful.
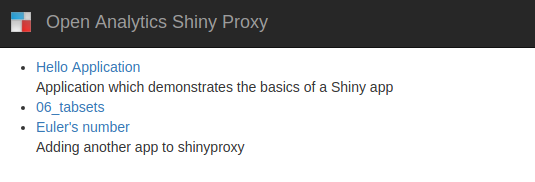
And does the application launch

Success!
Adding Additional non-Shiny Apps #
I'm going with a very basic 'hello world' flask app. The main issue here is configuring the ports for shinyproxy to pick up the app. Since shiny by default runs on port 3838, I mapped the containerised flask app to run on port 3838 too. I pushed a flask repo to github where I adjusted the 'hello world' flask app on line 28 to run on port 3838 (inside the container) and the dockerfile to expose the container's port 3838 (line 14).
# Clone repo
$ git clone https://github.com/ucg8j/flask-port3838-container.git

# Change directory
$ cd flask-port3838-container/

# Build image
$ docker build -t flaskapp .

# Test it runs as a docker container
$ docker run -p 4000:3838 flaskapp
You'll note that I am passing the publish argument -p 4000:3838. This allows you to map a container's port to the port of your host in the format of hostport:containerport. Since I've configured the flask docker container to port 3838 to mimic a shiny app I'll see whether I can manually map it to my computer's localhost of port 4000. That way I'll know that shinyproxy should be able to do the same.

Now to add the flask hello world image to shinyproxy by appending it to the app similar to the way we did with the additional shiny app:
apps:
  - name: flaskapp
    display-name: Demo Flask app
    description: Adding another non shiny app to shinyproxy
    docker-cmd: ["python", "app.py"]
    docker-image: flaskapp
    groups: scientists
Now (re)start shiny proxy java -jar shinyproxy-1.0.0.jar.
Auth #
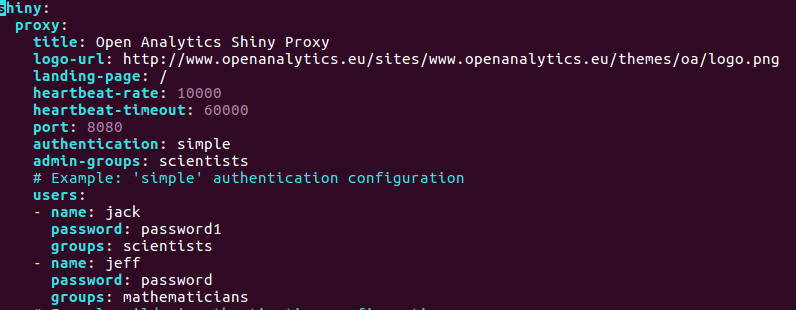
By default the authentication is setup to use a demo ldap server ldap://ldap.forumsys.com:389/dc=example,dc=com for more details visit this page. I'm going to switch this to use the simple authentication. I'm also going to change one of the passwords to be confident these changes are taking effect. The top half of my application.yml file now looks like this:
Deploy on a cloud service (nginx config) #
At this point it would be nice to have this on the cloud. Using nginx the following config worked for me which was an adaption of the config listed on the shinyproxy site. The box I was using was an Azure VM.
# Navigate into the nginx config
$ cd /etc/nginx/sites-available
# print the config that works for me
$ cat default
# Default server configuration
server {
  listen 80 default_server;
  listen [::]:80 default_server;

  root /var/www/html;

  # Add index.php to the list if you are using PHP
  index index.html index.htm index.nginx-debian.html;

  server_name **put your dns or domain here**;

  location / {

    proxy_pass                            http://127.0.0.1:8090/;
    proxy_http_version                    1.1;
    proxy_set_header Upgrade              $http_upgrade;
    proxy_set_header Connection           "upgrade";
    proxy_read_timeout                    600s;
    proxy_redirect                        off;
    proxy_set_header Host                 $http_host;
    proxy_set_header X-Real-IP            $remote_addr;
    proxy_set_header X-Forwarded-For      $proxy_add_x_forwarded_for;
    proxy_set_header X-Forwarded-Protocol $scheme;

  }
}
Once you have shinyproxy running on a cloud server, you may want to leave the application running without having a terminal open. To run leave shinyproxy running in the background run the following:
nohup java -jar shinyproxy-1.0.0.jar &nohup is not a permanent solution. For instance, if your server goes down, shinyproxy will not automatically reboot. nohup did allow me to quickly get the app running in the background. Check the app, discover issues I needed to address then find the process by running ps aux | grep java kill that process... rinse and repeat until complete. To leave this permanently on a Ubuntu 16 server the Spring documentation has a configuration guide for setting this as a system service. Additionally, this SO post is also very helpful.
Conclusion #
Shinyproxy is a great contribution to the R/Shiny community by the team at openanalytics. So a big thank you to them! Productionising shiny apps can be a bit of a pain considering the open source shiny server limitations (no authentication, no concurrency and no resource monitoring). Even accepting those limitations, dependency management of R applications is not widely practiced. Even when R applications use packrat, language level dependency management doesn't prevent your software breaking due to different system level requirements. Hence, the generalisation of running a website that proxies to containerised applications should be an incredibly reliable architecture.
Resources #
- How to deploy Dash apps on Shinyproxy
- Helpful SO post
- Configuring nginx
- Spring configuration options i.e.
application.yml
✍️ Want to suggest an edit? Raise a PR or an issue on Github